Part 1: Scaffolding a new Terraform project
Developing good habits is the foundation of a professional. Yet sometimes you just want to dive in and start coding so you end up cutting corners to focus on the task you are trying to accomplish. Before long you find yourself adding more and more code and things start to get shaky. This article shows a minimally scaffolded project to use as a starting point so you get in the habit of organizing your Terraform project code and working in a sustainable manner.
Terraform has changed and grown a lot in the march towards v1.0 and continues to improve. As of this writing, v1.2 is released and v1.3 is at the alpha stage. There are literally thousands of examples and code snippets written against ancient versions and nearly all use JSON formatting. HashiCorp invented HCL as a domain-specific language to describe the configuration of infrastructure; it is the native language of Terraform and, more recently, Packer has switched to using HCL as the default. All of the documentation has been updated to show examples in HCL, by default. If you are starting off on your journey it makes zero sense to learn older syntax and versions, especially as you are developing habits so I tried to make this as modern as possible by using the newest released version with HCL syntax.
I will present an approach that will:
- Use a standard directory and file structure for projects
- Use a standard set of resource tags
- Showcase techniques for variable manipulation and usage
- Written in HCL
Shown here is the directory structure for the starter project:
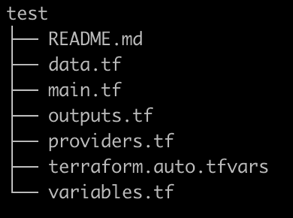
Remember that Terraform processes the code contained in all the .tf files when creating infrastructure. Separating the code by purpose rather than a single large file is a best practice to aid in understanding and maintenance. This helps enforce a modular design that avoids messy "spaghetti code" by promoting the principle of separation of concerns.
Files Created
README.md describes what the project is designed to do, offers sample usage and notes for customizing.
data.tf contains the data statements used to lookup values exposed by the providers.
main.tf de facto starting point containing the mainline logic
outputs.tf defines output values exported when the project is run.
providers.tf list of providers (pluggable components containing functionality, essentially third party libraries)
terraform.auto.tfvars contains default values for some or all variables (automatically loaded)
variables.tf defines the variables used in the project.
Providers
Defines the minimum required version of Terraform to use as well as the AWS provider, giving access to all the functionality needed for creating AWS resources.
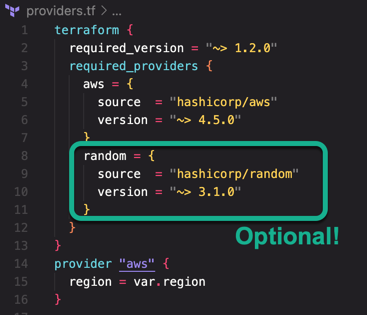
Note that the Hashicorp Random Provider is also included. While technically not necessary (it can be removed if needed) you will find yourself creating a lot of cloud resources that must be named. This is a handy way to add a random string to the name thus avoiding name collisions.
After the terraform{} block is the declaration of the AWS provider that also initializes the region being used. For many if not all use cases you'll be creating infrastructure in a single region. Notice that the region attribute is being initialized from a variable called 'region'. More on that later.
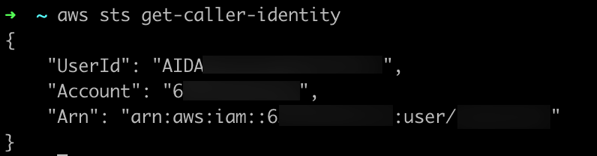
Data
The data{} block allows you to lookup values exposed by the provider.

Here I am looking up the identity of the current user when the Terraform commands are being run. Doing so allows for more dynamic code by avoiding hardcoding values. Using the aws_caller_identity provider is equivalent to the AWS CLI command get-caller-identity that returns output like this:
Outputs
Outputs.tf is how you save, or "export", various values from this project for re-use elsewhere. When the plan is applied, the outputs will be displayed on the console as well as being recorded in the state file. One use would be writing out the IDs of resources that are auto-generated by AWS, such as the VPC ID, so that it can be referenced in other projects when creating resources that must be assigned to a VPC.
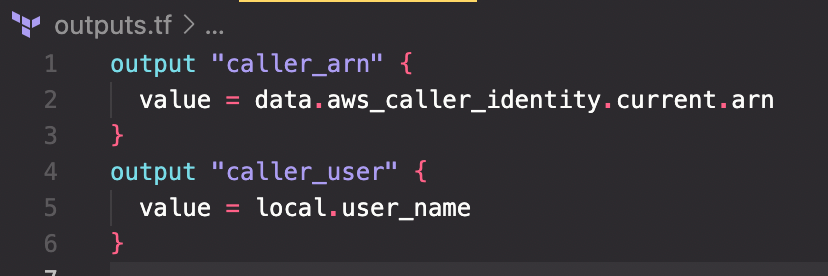
The first output I've created is not technically for re-use but it is useful to record the ARN (Amazon Resource Name) of the identity used to create the infrastructure. It is also an easy way to illustrate the prior data lookup being put to use. Notice the name references the data block for the value:
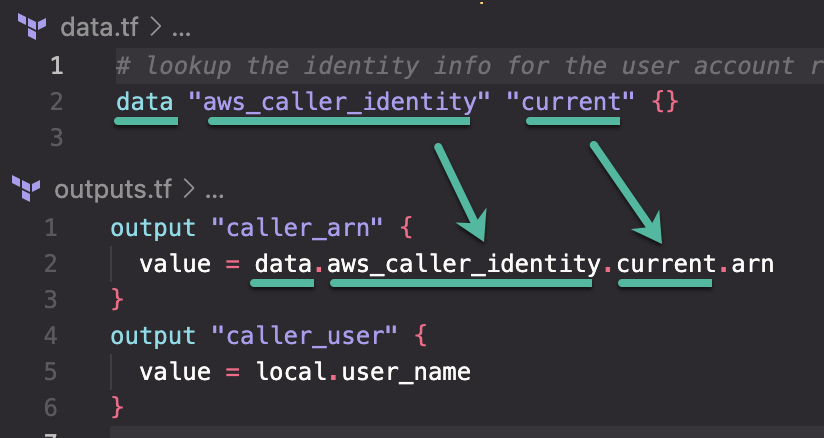
The second output emits the user name portion of the ARN which leads to the next file template.
Variables
Arguably, the variables defined and used are equally as important as the main logic for the infrastructure is. Variables determine how flexible and useful your code is—how professionally written it will be. It is true that you could hardcode everything and the project would be quickly finished and will probably work. However, what happens when you need to run this code again for a different use case? Do you make a copy of the file and change the hardcoded strings in the copy? Ugh! That's a rookie mistake beginning programmers make so learning how to make it flexible and reusable is a step on your journey to becoming a DevOps Professional.
Here are my recommendations for a standard set of variables to include in any project.
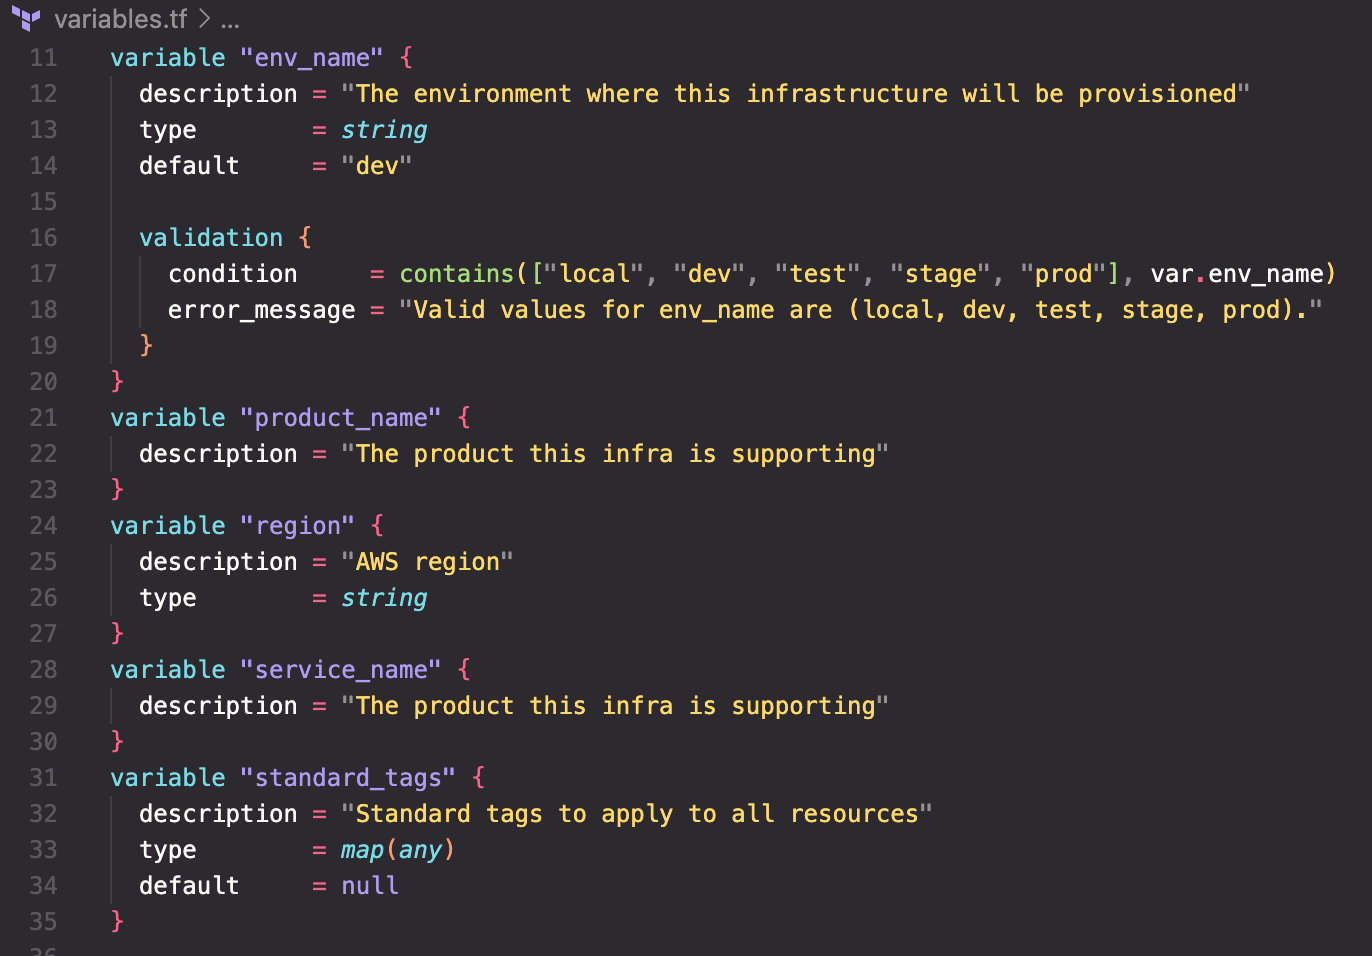
env_name is a commonly used value to identify the purpose and use of the infrastructure. For example, 'dev' is the infrastructure that developers use, 'test' is where the product (application or service) is tested, 'stage' is where you stand up the released product prior to deploying to 'prod' which is the production environment.
Note that following this style of coding allows you to have multiple sets of infrastructure installed in a single AWS account. You may not want or need all this infrastructure initially but using this pattern saves you in the long run. For example, you quickly deploy a 'dev' environment to begin developing. Later, you decide you need to test everything and suddenly need another environment. Easy, run the infrastructure code again with 'env_name = "test"' and you are ready to go. Think of it this way, every git repository has at least one branch named 'main' so your infrastructure should have at least one environment that, by convention, is called 'dev' when you first begin developing the product.
env_name also shows another feature of validating the possible values. While it may seem a silly inconvenience to bother coding this it actually serves two other purposes—it makes your code self-documenting by listing all the possible values and it prevents sloppiness when others join the project. One person might like 'dev' while another prefers 'development' and a third likes 'staging' rather than 'stage'. Suddenly you have chaos leading to frustration because you've lost consistency. Lastly, notice that env_name has a default value of 'dev' so that is what the environment will be known as unless you specify something else.
product_name and service_name are somewhat informational and are used to tag resources along with env_name.
region should be self-explanatory. We saw that being used in the AWS provider discussed previously.
locals is the missing piece, located at the top of variables.tf and is used with expressions to create useful named values. While that may seem vague, actually seeing it should make it clear:
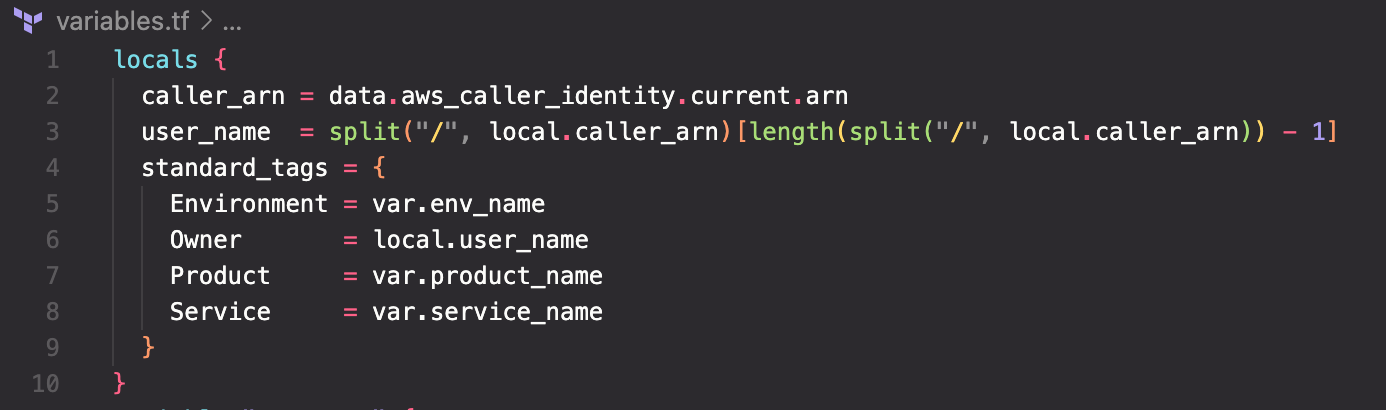
The first local, called 'caller_arn', is more of a convenience name. As you can see, the ARN of the identity lookup in the data source is being copied to 'caller_arn'. In the very next local you see the 'caller_arn' being used in a more complex expression. By defining the local name 'caller_arn' it gives instant meaning and avoids having to use the extremely long syntax of the data expression.
user_name is a good case study in using built-in functions and expressions to parse values. Remember the identity block shown earlier? The ARN is a long string ending in ":user/yourname" where 'yourname' is whatever IAM profile login you are using. The split() function separates that ARN value by breaking it apart where the slash character "/" is found. The extra "math" involving length basically accounts for the use case where you might be running the code using an assumed role instead of a simple IAM profile. In that case, instead of ":user/yourname" the ARN will end with ":assumed-role/rolename/yourname" so a simple split() would pick up the wrong portion. The length() function is simply counting the number of elements returned in the split() call and grabbing the last one so you'll always get the "yourname" portion at the end regardless of the type of login that was used.
standard_tags is an HCL map constructed from the variables previously defined. Being able to tag resources with this standardized set of key values is crucial to managing what can likely become hundreds if not thousands of resources. The Owner tag uses the ‘user_name’ we just worked so hard to parse out while the other three are straight copies of the respective variables. You'll see this map used in a coming post.
The Goods
All of this may make sense but who wants to remember all that or, worse yet, type it all in. I have created a simple Bash shell script that will construct the project for you along with creating all files mentioned. It takes one parameter that is the name of the project which it uses to create a directory with and populate the files there. Trust me, it is nothing fancy as it uses heredoc syntax to populate the files. However, it is easily adaptable to your own specifics.
You can find the script in my GitHub Gist.
If you would rather take it for a spin quickly, after examining the code to make sure nothing bad is being done, you can run it directly from GitHub using this command:
bash <(curl -s https://gist.githubusercontent.com/jwatson3d/7f977da0c1db9c4ed1c3c75711081e03/raw/70597b7e6c1e16cb4924a131e5de97f5140c540d/tf-proj-scaffold.sh)
Running the above command will create a subdirectory called ‘test’ with the starter files created in there.
Summary
I have outlined the structure of a basic Terraform project as well as provided explanations of each aspect. I also provided a simple Bash shell script that you can use to quickly create this structure on a project of your own. Future posts will expand on this foundational approach by going through building the code needed to stand up a full set of infrastructure on AWS.